In this topic: |
The ability to group transactions may be the most powerful feature ManagePLUS offers for quickly getting information from your transaction records. It lets you quickly arrange transactions into any groups based on the content of particular columns in the grid, and automatically provides totals, summaries, and statistics for selected columns within each group.
| Grouping is a powerful feature that's easier to use than to explain: The quickest way to understand it is to just try it! |
| Currently only the Transactions window supports grouping. (None of the other windows really needs that capability at this time.) |
Grouping isn't magic; it's something you see all the time. In fact, nearly every accounting report is grouped in some way . For example, a Profit and Loss report is grouped: transactions are sorted into groups by account, and the report provides summary statistics for each group (account) as revenue and expense subtotals and totals.
What is closer to magic is that, unlike most reports, ManagePLUS gives you direct, immediate control how transactions are grouped. You can form groupings, rearrange them if you want, or remove them entirely, by simply dragging column headers around in the grouping panel.
How to group a grid
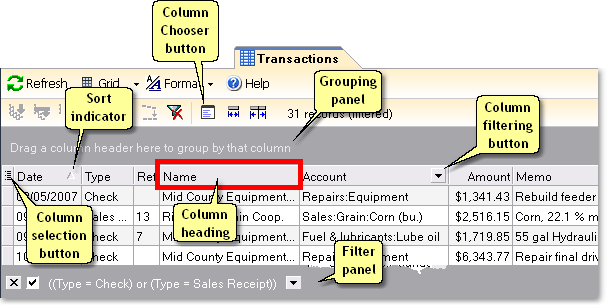
The Transactions window normally has a grouping panel at the top, as shown in this illustration of common grid features:
| If the grouping panel isn't visible, you can force it to be displayed by resetting the grid. |

| • | To group the grid by a particular column, drag that column's header into the grouping panel. |
| • | To ungroup the grid, drag all column header(s) out of the grouping panel and back into the headers area of the grid. Or, you may use the ungrouping toolbar buttons or Grid menu commands. |
| You'll find details on grouping in the Quick Start Basics topic Using grid features to view transactions. We won't be repeating those details here. |
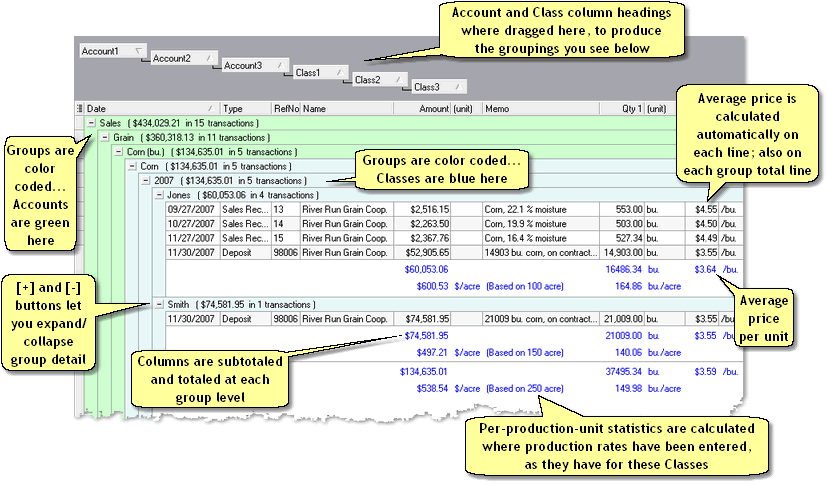
Here's an example of the Transactions window grid grouped by the Account and Class columns. As ManagePLUS does for most QuickBooks list types, it has automatically swapped in substitute Account and Class columns representing each level of those lists, to give the groupings the multilevel structure you expect to see.

Things to know about grouping:
| • | You can group by any number of columns. |
| • | The grid automatically subtotals and totals all grouping levels. Also, groupings based on columns which have management quantity information, such as the Classes column, provide additional per-unit statistics and information. |
| • | You can rearrange the grouping order by dragging column headings to different positions within the grouping panel. |
| • | You can ungroup any column by dragging the column heading back out of the grouping panel and into the grid's heading area. (Drag the column heading to wherever you want it to appear within the grid.) |
| • | The current expansion state of grouped rows is adhered to when you print or export transactions. You can leave some groups expanded and others collapsed to control the appearance of printouts or exported files. |
| • | Most column header commands (sorting, filtering, column selection) work even for grouped columns. For example, you can click on a column header in the grouping panel to change that column's sort order. |
| This is a subtle but very valuable feature of ManagePLUS...so don't skip reading this section or you'll miss out! |
You can drag column headings to different positions in the grouping panel to change the grouping order. You may even change the order within a particular column type, such as Classes columns. This means ManagePLUS' transaction reports are not limited to the original structure of your QuickBooks Classes list. Let's consider an example.
Suppose your Classes list is structured like this (Crop name » Crop year » Farm location):
Corn |
||
|
2007 |
|
|
|
Jones Farm |
|
|
Smith Farm |
|
2008 |
|
|
|
Jones Farm |
|
|
Smith Farm |
Soybeans |
||
|
2007 |
|
|
|
Jones Farm |
|
|
Smith Farm |
|
2008 |
|
|
|
Jones Farm |
|
|
Smith Farm |
If you group transactions in the Transactions window by account and by class, the grouping panel will look something like this:

And the transactions will be arranged with the same structure shown above; that is, the same as the original Classes list.
But suppose you'd like to have a report of income and expenses by Crop year. Crop year is the second level of the Classes list, corresponding to the Class2 heading in the grouping panel. So all you need to do is drag the Class2 heading to the left and drop it between the Account3 and Class1 headings.

When you've done that, the grouping panel will look like this:

The effect of all this, will be that transactions are now grouped in the following class arrangement (the Crop year is boldfaced to emphasize it's new position):
2007 |
||
|
Corn |
|
|
|
Jones Farm |
|
|
Smith Farm |
|
Soybeans |
|
|
|
Jones Farm |
|
|
Smith Farm |
2008 |
||
|
Corn |
|
|
|
Jones Farm |
|
|
Smith Farm |
|
Soybeans |
|
|
|
Jones Farm |
|
|
Smith Farm |
Any arrangement of class levels is possible. More important, the management quantities you entered on the Classes tab—things like acres or bushels of production associated with individual classes—properly "follow" classes to their new spot in the hierarchy and are properly accumulated "upwards". For example, the total crop acreage at the 2008 level would be the sum of acreages from the Corn and Soybeans levels, and acreages at those levels would be the corn and soybean acreages specified for the Jones Farm and the Smith Farm for 2008. So things like per-acre and per-bushel revenues and costs will be based on the appropriate management quantities, regardless of how you might rearrange the grouping panel.
|
A neat grouping trick: Arranging Classes however you want!
|
As mentioned above, you can ungroup a column (i.e., remove groupings based on it) by simply dragging it's column header out of the grouping panel and back into the headers area of the grid.
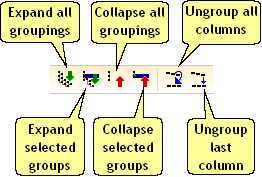
But also, the data window's toolbar (and Grid menu) have a couple of ungrouping commands available. Notice the two rightmost toolbar buttons shown here:

The Ungroup all columns button removes all column headings from the grouping panel.
The Ungroup last column button removes suggest the last column heading.
Ungrouping QuickBooks list columns
When you ungroup a QuickBooks list column (Account, Class, etc.), things work a bit differently.
Suppose the grid's grouping panel looks like the following. It tells us the grid is grouped by Account and by Class. (ManagePLUS has swapped in substitute column headings representing the structure of those two lists, to make groupings have that same structure. In this example, both the Chart of Accounts and the Classes list have three levels.)

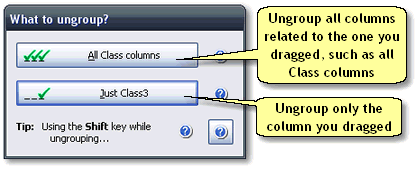
You could ungroup the Class column by dragging any of the Class1..Class3 headings out of the grouping panel and into the headers area of the grid. For example, suppose you drag the Class3 heading out of the grouping panel. When you do, ManagePLUS needs to know whether you intend to ungroup all of the Class substitute headings (Class1..Class3) or just the Class3 heading. So it displays this dialog:

If you click the All Class button, then all of the Class1..Class3 column headings will be removed from the grouping panel and the Class column will reappear in the grid. Usually, this is the best choice, because it removes all Class grouping levels at once. Only if you have unique information needs might you want to ungroup some of a column's grouping levels but not others.
|
"When would I want to ungroup only one or two substitute columns?"
Answer: When you want to reduce the amount of grouping detail in the grid. In the example above, if you ungroup by Class3 you'll be removing the lowest level of Class grouping detail, but leaving the Class1 and Class2 levels. |
See also:
Using grid features to view transactions in the Quick Start Basics
