This example demonstrates:
| ® | Using the Scratchpad for calculations |
| ® | Using the GETVAL function to extract numeric data (a weight) from a text field |
| ® | Calculating a value (extended weight) from two columns (weight and quantity) |
| ® | Totaling a column |
| ® | Appending calculated results to a field's contents |
This approach is discussed in greater detail in the Tutorial: steps for using FullSpeed topic, with QuickBooks Online as the target application. Rather than duplicate that full discussion here, we have duplicated only the important steps and included Xero-specific screenshots.
Please refer to the tutorial for fuller explanations of FullSpeed concepts. |
Overview
You can calculate a total shipping weight on invoices and other sales forms in Xero, using a FullSpeed macro.
The main requirement is that you add per-item weights to your Inventory Items, by editing the Description field of each item you ship and inserting a per-item weight in the Description. If you do that, then when you select an Inventory Item on an invoice or other form, Xero will automatically bring the shipping weight into the form as part of the Description, where it will be available to FullSpeed to use in calculations.
| For details on storing data in text fields see the GETVAL function reference topic. |
With the per-item weight available on each line, a macro formula can multiply it by the quantity to calculate an extended shipping weight for each line (weight * quantity = extended weight). Finally, the extended weights are totaled and the total is written onto the last line of the sales form (invoice, etc.).
Here's an example Xero invoice, before the shipping weight calculation:
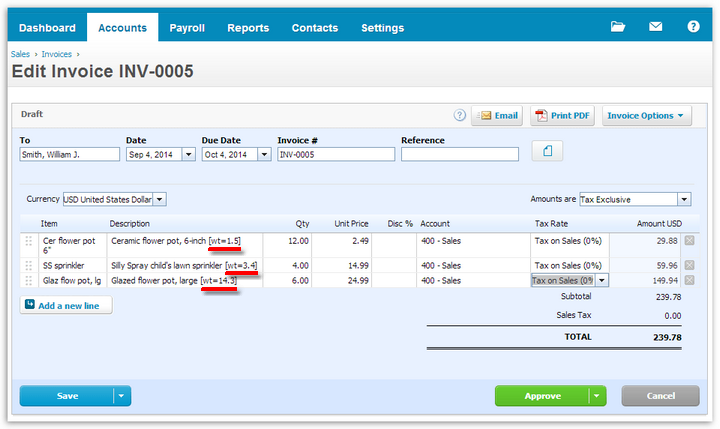
Notice the text underlined in red. That's where the per-item weights will come from. The weight information—such as [wt=1.5]—was added to the item descriptions by editing Inventory Items in Xero, as shown here:
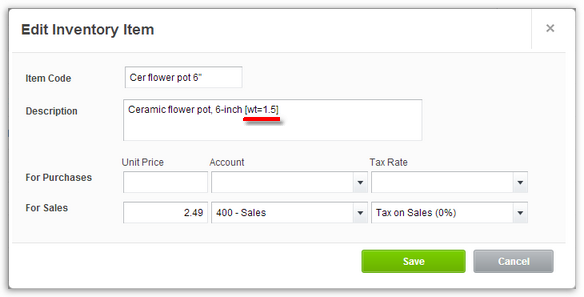
This way, selecting an item on an invoice will automatically bring its weight into the invoice in the Description column.
| For details on how to store data in text fields see the GETVAL function reference topic. |
| 2. | Open Xero and enter some data |
The Xero invoice shown above is an example of that.
| About Web browsers: FullSpeed works with most browsers but not all. Some, like Google Chrome, require specific settings. See the Web browser notes topic for details. |
| 3. | Start FullSpeed |
The first time you start FullSpeed, a new, blank file will be created for you to work in. Or, you can select File > New to start a new file.
| 4. | Choose a macro worksheet 0..9 to work with |
A FullSpeed file can have up to ten macros in it, on worksheets numbered 0..9. This example will use macro worksheet 0. To select it, click on the 0 tab at the bottom of the spreadsheet window.
Think of the columns in a FullSpeed macro worksheet as corresponding 1:1 to columns in Xero. The only difference is that macro worksheets do not have to represent all of Xero's columns (fields). Only the range of columns (fields) involved in the calculation need to be represented.
The macro we are creating will involve the 1st through 3rd columns of the invoice—Item, Description, and Qty—so the macro worksheet only needs to have those columns represented. (But it's a good idea to leave a blank column or two to the left of the worksheet columns you do use, in case the target application's column layout changes.)
Labeling the columns is optional but is always a good idea! Adding descriptions on the Column or field names row helps you keep track of where formulas need to be entered, to match up with the target application's fields. Here we've labeled columns to match the invoice shown above:

Here's the macro worksheet with the formulas in place:
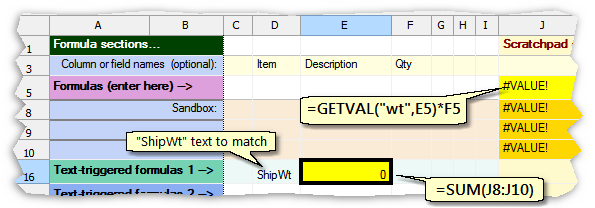
The first formula is entered in a Scratchpad column, because Xero has no spare columns available to hold the extended weight calculation. The formula extracts the item's weight from the Description field and multiplies it by the number in the Qty field, to calculate an extended weight:
=GETVAL("wt",E5)*F5
| Wait a minute! Why do the results in the Scratchpad column show #VALUE instead of numbers? The reason is that the =GETVAL function tries to extract an item weight from cell E5, but E5 has no data in it...at least not yet! |
The second formula is entered on a text-triggered formula row. We want the formula to be calculated only when FullSpeed finds ShipWt in the invoice's Item column. So enter ShipWt (the text to be matched) in the Item cell on text-triggered formula row 1. Then, to have the shipping weight written in the Description column on that row, enter a formula in the Description column to total the extended weights:
=SUM(J8:J10)
| Why does this formula refer to cells in the Sandbox? When a formula refers to the range of Sandbox cells, that is a shorthand way of telling FullSpeed to refer to "the whole column of data" when the macro actually runs. |
|
The quick way to enter a "whole column of data" cell range is to make both coordinates of the cell range point to row 0. You could enter the formula shown above as: =SUM(J0:J0) and FullSpeed would automatically adjust it to point to the range of Sandbox cells in the same column: =SUM(J8:J10) |
| 7. | Enter some sample data to test your formulas (optional) |
To see if your formulas work as expected you can enter sample data in cells to which the formulas refer. Here's the same worksheet, after entering sample data on the Formulas row and in the Sandbox. Now the formula results look as we would expect them to:
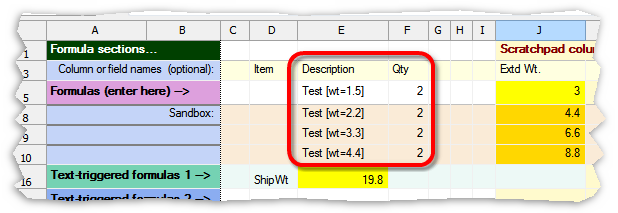
The total shipping weight shown above, 19.8, looks fine. But what if one of the items had a weight of 1.03795? Then the shipping weight might show more decimal places than you want to see! To avoid that possibility you can format the formula cell.
To format a cell, either click the Format button in the Editing toolbar or right-click the cell and choose Format from the pop-up menu:

This will open the Format data or results window, where you can choose formatting options.

The formatting options selected in this screenshot will (1) limit the shipping weight total to two decimal places, and (2) cause it to be appended to the target application field's contents—i.e., added to the end of whatever is in the Description field.
| See the Formatting results (and sample data) topic for more information. |
Choose appropriate options for running the macro...
Macro options toolbar settings

Notes:
| ® | The target application is Xero. It is very important to select the correct target application. If you don't, your macros probably will not work. |
| ® | Repeat until "X" blank fields is selected. That will cause the macro to run until it has processed all rows of the invoice. |
| ® | Ctrl+0 is the hotkey assigned to this macro. We will use this hotkey to run the macro in Xero. |
Mark the "mapping" cells
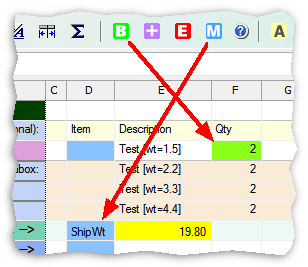
You need to "map" the worksheet's cells to Xero's invoice fields, by selecting a Begin field and—because the macro needs to match the ShipWt text in a column of the invoice—a Match column.
| ® | To mark the Begin field click in the Qty cell, then click the green [B] button in the Editing toolbar. |
| ® | To mark the Match column click in the ShipWt cell (or any cell in that column), then click the blue [M] button. |
| 10. | Save the macro file...often! |
Remember to save the FullSpeed file often, so you don't risk losing your formulas and settings. You can use the Save button in the main toolbar or select File > Save from the main menu.

| 11. | Try the macro |
| 1. | Go to Xero. |
If it is already open in your Web browser, just go to the Xero tab in the browser.
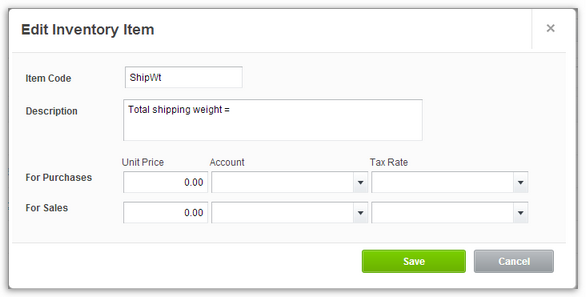
| 2. | Enter some sample data. The Xero invoice shown earlier will work for this, but it still needs a ShipWt item to trigger the shipping weight calculation, so add it to the Inventory Items list: |
Notes:
| ® | The Item Code / Name and Description can be anything you want. |
| ® | No Accounts nor Tax Rates were selected, because this item should not post any income or expense. If you select accounts that's OK though, because with the Unit Price set to 0 no income or expense should ever be recorded. |
Add the item to the bottom of the invoice:

| 3. | Click in the Begin field before running the macro. |
Qty was selected as the Begin field in step 9, so click in the the Qty field on the first row of the invoice. To process the entire invoice, you must start at the top—on the first row.

| 4. | Press the macro's hotkey, Ctrl+0 in this example. |
The focus will move among fields on the invoice, gathering data, and when it gets to the ShipWt line it will add the calculated shipping weight total there:

Checking the results
As you can see, the macro calculated a total shipping weight of 117.40 and added it to the ShipWt line.
But is this number correct? The best way to find out is to go to the Workspace tab in FullSpeed and review the calculations.
Here's a view of the Workspace tab. You can see Description and Qty information that was gathered from the invoice, and the calculated extended weight for each line:

But where is the shipping weight total? The T in the RowType column stands for "text-triggered". Text-triggered formulas are offset to the right of D (detail) formulas (for technical reasons). Scrolling to the right and narrowing the columns a bit, we find:

Here you can see that the formula in cell N5, =SUM(J1:J4), sums the extended weights in column J. And you can verify that the total looks correct.
What's left? Use it!
The macro is ready to use for shipping weight calculations on any Xero invoice.
