The end goal of allocating revenue and costs, of course, is to examine the profits or costs associated with each segment of the business; i.e., its profit centers and cost centers. This lesson shows how to prepare a ManagePLUS Gold Profit Analysis report, which is a profit and loss report for a profit center or cost center but with enhanced information about allocated amounts.
Before you start...
If you skipped the advanced quantity handling tutorials, please do the following to make it easier for you to follow the steps in this lesson:
| 1. | Be sure the Enable advanced quantity handling option is on (check marked) in ManagePLUS Preferences (Edit > Preferences > Company > Options). Some of the quantity information shown in this lesson will only be available with advanced quantity handling. |
| 2. | Go to the Transactions window and refresh transactions from QuickBooks, to cause transaction quantities to be recalculated. |
| 3. | In the Classes window, add the following management quantity entry for Crops:Corn, if it isn't there already: |

Preparing a Profit Analysis report
The easiest way to get a Profit Analysis report is to locate the cost center or profit center for which you want the report, than a right-click and select the report from the pop-up menu.
| 1. | Select or open the Classes window in ManagePLUS Gold. |
![]()
| 2. | Find the Crops:Corn class. (You may have to scroll down.) |
| 3. | Right-click anywhere on the Crops:Corn row, then select Profit Analysis report (for this class) from the pop-up menu. |

| Another way is to choose Reports > Profit or Cost Center Analysis from the main menu, . |
ManagePLUS Gold will open the report in a new tab:
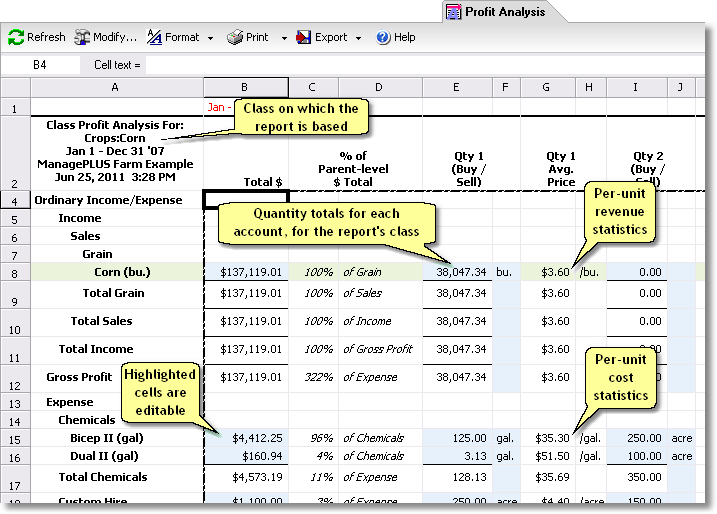
| This report is based on a small set of example transactions...don't be surprised if some of the numbers and per-unit statistics appear odd or outside of "real world" expectations. |
| 4. | Scroll down to the bottom of the report, and notice the Allocated Expense (MP) section. |
This is where allocations from other classes appear. In a prior lesson you allocated some of the expense from the Equipment:Combine cost center to the Crops:Corn profit center, and that shows up here.
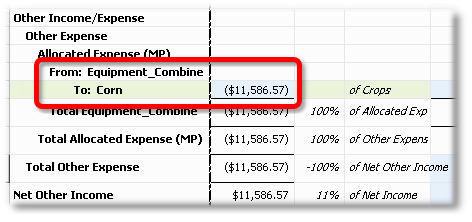
If you had made other allocations to Crops:Corn, they would appear in this section too.
| 5. | Scroll up (if necessary) to the Utilities:Electricity line in the Expenses section of the report. |

In an earlier lesson you allocated this amount from Utilities:Electricity expense to Crops:Corn. But why is it here in the Expense section of the report and not in the Allocated Expense (MP) section? Because allocations from accounts to classes are handled as normal income or expenses. Only allocations from classes to other classes are included in Allocated Expense (MP).
Because allocating an amount from an account to a class in ManagePLUS Gold has exactly the same effect as assigning a class to a transaction in QuickBooks. The only difference is that the class is being assigned to an income or expense outside of QuickBooks when you do it in ManagePLUS Gold. |
Adding/changing information in a report
While many of the cells in a report spreadsheet are formulas, and not editable, ManagePLUS lets you edit any cells highlighted in the Editable cells color (light blue in these examples). That's handy for adding quick calculations or changing data on which part of the report is based. The following steps show how to add or change a management quantity in the report, to have per-unit costs calculated on a different basis.
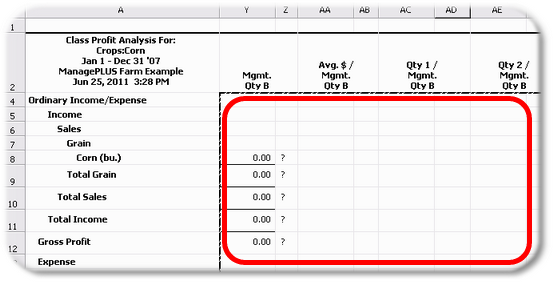
| 1. | Scroll to the right side of the report, and notice that the Mgmt. Qty B columns are mostly empty: |
| If the columns shown above are not present, click on the Modify button in the report window's toolbar, then check mark the missing column choices (on the Layout tab of the Modify Report dialog). |
These columns are empty because there's no Mgmt. Qty B associated with Crops:Corn in the Classes window. We could go back to the Classes window and supply one, then re-create the report. But there's a quicker way. We're going to supply a Mgmt. Qty B right there in the report, to calculate costs on a per-bushel-sold basis.
First though, we need to find how how many bushels were sold.
| 2. | Scroll to the upper left part of the report, and click on the cell where the Corn (bu.) row and Qty 1 column intersect. |
This cell shows the Corn sales quantity, totaled from the QuickBooks transactions for the Sales:Grain:Corn account.
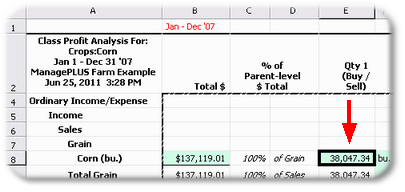
Let's copy this quantity, and paste it into the report's Mgmt. Qty B cell.
| 3. | Right-click on the cell, then select Copy from the popup menu. |
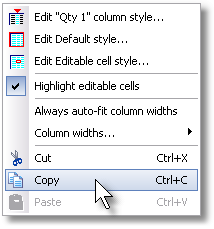
| 4. | Click on the Class Info tab at the bottom of the report window. |

| 5. | Right-click on the cell where the Corn row and Mgmt. Qty B column intersect, then select Paste from the popup menu. |
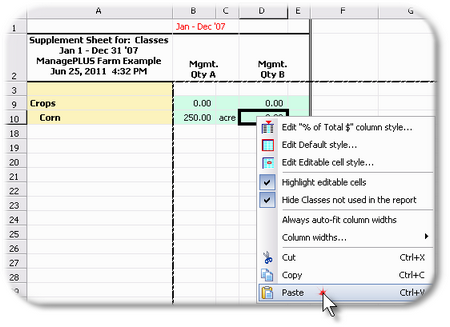
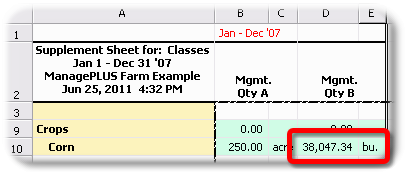
| 6. | Click in the cell just to the right, then type "bu." there. |
The window should look something like this when you're done:
| 7. | Click on the Main Report tab at the bottom of the report window. |

| 8. | Scroll to the right side of the report again, and notice what's in the Mgmt. Qty B columns now: |
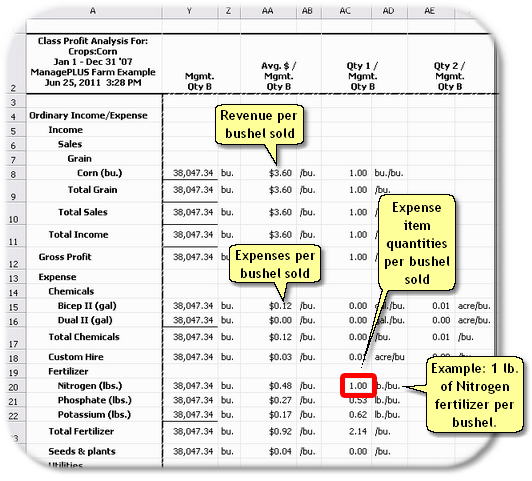
Now the Mgmt. Qty B columns show statistics for each income and expense amount on a per-bushel-sold (Mgmt. Qty B) basis.
| Changing any highlighted (editable) cell in a report will cause all cells which depend on it to have their amounts updated immediately. |
|
Want to change even more?
The easiest way to make extensive report changes—add new formulas, hide/delete/add rows or columns, etc.—is to export the report as a Microsoft Excel file, then open it in Excel or any Excel-compatible spreadsheet program. |
See also:
Working with Cost Centers, Profit Centers, and Allocation in How-To Procedures

