Part I of this series discussed QuickBooks' Credit Card account type, and the fact that the IRS considers credit card purchases to be deductible as of the date of the purchase, regardless of when the credit card balance is paid.
Part II explored whether common sources of agricultural point-of-sale credit can be handled like credit card accounts from the perspective of the IRS; that is, whether purchases made with an account from John Deere Financial or CNH Industrial Capital (or a dozen others) are immediately deductible as farm business expenses. The conclusion was that these accounts are equivalent to dealer credit, not credit cards. As a cash basis taxpayer, you can only deduct purchases made with those accounts as expense after you've paid for them.
But QuickBooks' Credit Card account type has handy features. Can you use it for working with credit accounts which don't qualify as credit cards yet work like credit cards? The answer is "Yes", though you need to be mindful of a couple things. Here in Part III we look at using the Credit Card account type for working with agricultural credit accounts.
Reminder: Like most QB Ag Center articlesthis one assumes cash basis accounting, and that income taxes are also filed on a cash basis.
Your farm business likely has a credit account provided by a farm input supplier or machinery company, such as John Deere Financial, CNH Industrial Capital, or AGCO Finance, or you may have a "store card" (charge card) or open account with Sears, Home Depot, O'Reilly Automotive, or other retailers. If so, you have three alternatives for working with these point-of-sale credit accounts in QuickBooks:
1.Just write a check each month, to pay all or part of the account balance; that is, enter a check in QuickBooks, with details of the purchases you've made during the month entered on the check, and send it as payment on the account. This is not a bad approach if you pay the entire balance owed on the account every month, but as discussed in Part I it can lead to confusion and problems if you sometimes only make a partial payment.
2.Use Enter Bill/Pay Bills to enter charges on the account as Bills, and to select bills to pay when they are due, in the Pay Bills window. Enter Bills/Pay Bills is designed for handling dealer/vendor credit, which includes all of the agricultural credit account types mentioned above. However, using Enter Bills and Pay Bills lacks some of the nice features for working with credit accounts which you can have by using the Credit Card account type, such as an easy way to reconcile the account.
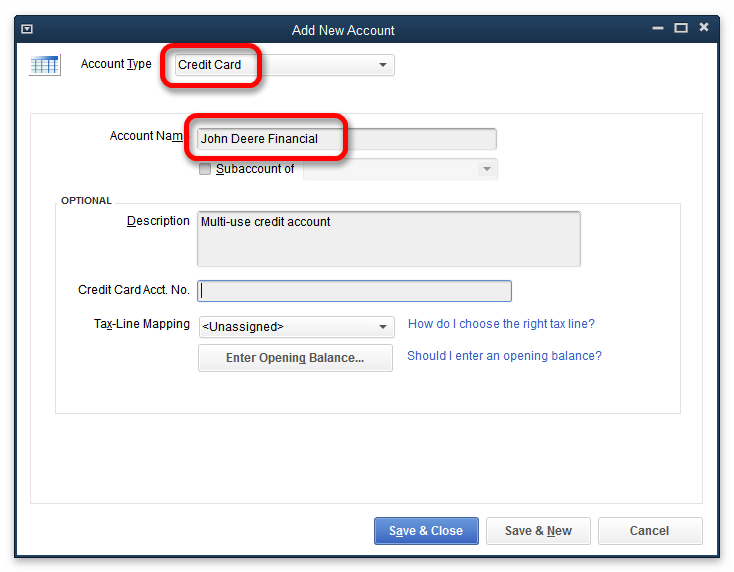
3.Set up a Credit Card-type account for the accounts that you want to manage like credit cards, and use it for your monthly cycle of entering charges, reconciling the account, and making payment. The Credit Card account type is not the right choice for all credit accounts but has features which make it handy for working with some of them.
Maybe the best way to consider pros and cons of using the Credit Card account type (for accounts which don't qualify as credit cards), is with real-world examples. The topics below do just that, based on working with a John Deere Financial (JDF) Multi-Use account—accepted for purchases by a large number of farm input suppliers, as well as at John Deere machinery dealers—as a Credit Card-type account in QuickBooks.
We explored the benefits and basic use of the Credit Card account type in Part I, so that information won't be repeated here.
Sorry, no QuickBooks Online screenshots in this installement. QuickBooks Online has been down (unavailable) for several hours as I complete the article, preventing me from taking screenshots there.
That's not all bad: the article is long enough already, with only screenshot from QuickBooks desktop editions.
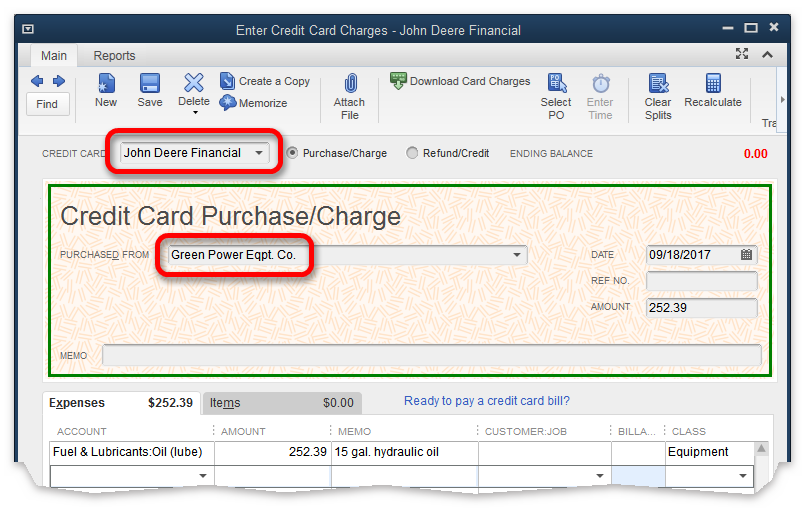
The Enter Credit Card charges form in QuickBooks desktop editions, or the Expenses form in QuickBooks Online, lets you enter purchases made on the account.
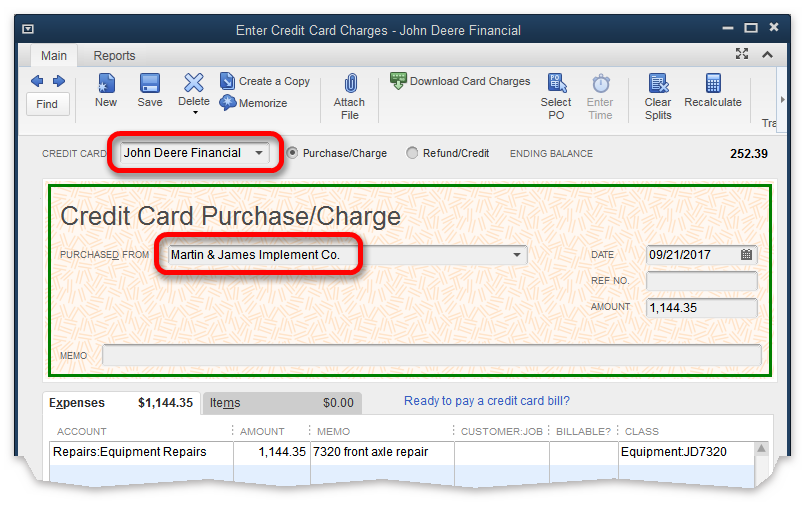
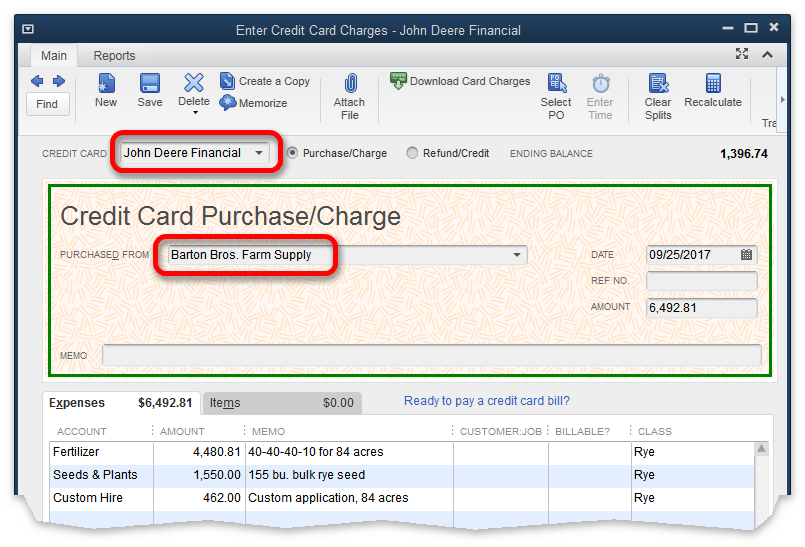
Let's suppose that during the month our JDF account was used for making purchases at two different John Deere dealerships, and also at a farm supply dealer. The entries for those charges might look like the following:
QuickBooks desktop menu commands: Banking > Enter Credit Card Charges
(In QuickBooks Online: Expenses > New Transaction [button] > Expenses > [Payment method: choose the JDF account])
A benefit of using the Credit Card account type here, is that it allows us to identify the vendor for each purchase. At any time we could get a list of purchases for either of the two machinery dealers or Barton Bros. Farm Supply, or for the entire JDF credit account. And making a payment on the account would be simple, because the account balance and all transactions would be in one place: associated with the Credit Card account we created to represent the JDF account in QuickBooks.
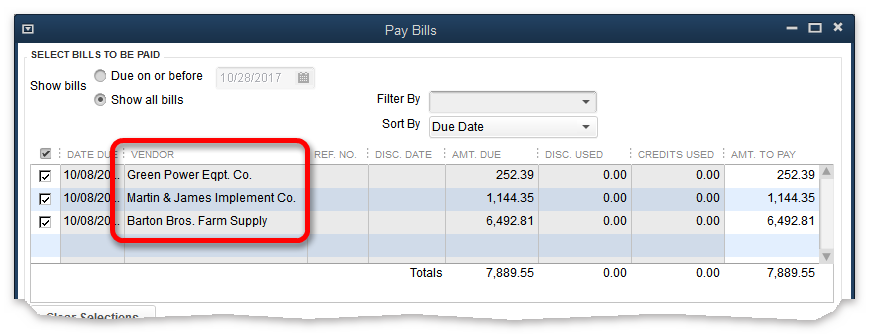
The charges could be entered as Bills rather than credit card charges. However, that would come with a decision to make: who will you select as the vendor on each Bill? You might assume you should select Green Power Equipment, Martin & James Implement, or Barton Bros. Farm Supply as the vendor on their Bills, respectively. But if you do, you will have two problems to deal with when you go to Pay Bills:
❖Pay Bills from different vendors? To pay all of the charges on the JDF account you will need to select the bills for each of the different vendors involved. You won't be able to simply select all bills for John Deere Financial, because none of the bills you've entered have "John Deere Financial" as their vendor. The amount of confusion this adds to the process of paying bills will depend on how many bills you have entered and how many different vendors are involved.
QuickBooks desktop menu commands: Vendors > Pay Bills
(In QuickBooks Online: [Plus sign] > Pay Bills)
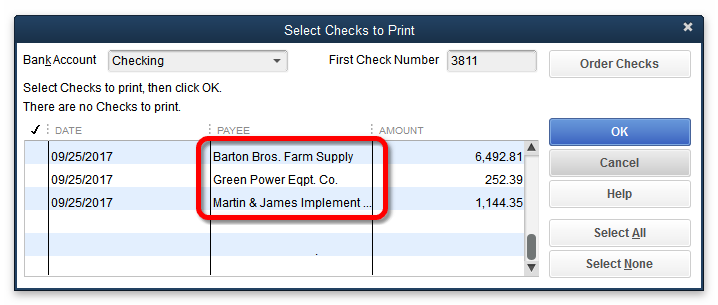
❖Three checks...not one! The problem will grow worse when you have finished selecting bills to pay and click on the Pay Selected Bills button (at the bottom of the Pay Bills window). You need to prepare a check payable to John Deere Financial, but QuickBooks will prepare three separate checks—one to Green Power Equipment, one to Martin & James Implement, and a third to Barton Bros. Farm Supply—because those are the vendor names on the Bills you selected for payment!
The best way to make Enter Bills/Pay Bills work with an account like our JDF example, where several vendors are involved, is to enter each Bill with the master account name (John Deere Financial in this case) selected as the vendor. That way, when you go to Pay Bills you will be able to select all bills for the John Deere Financial vendor, and QuickBooks will prepare a single check as payment on the account.
As for identifying the businesses where the purchases were actually made, you could do that by adding a note in the Memo as you enter each Bill. However QuickBooks cannot use that information as the basis for preparing reports, so you'll be giving up the option to quickly get a list of purchases made from those individual vendors.
The easiest way to manage a credit account that is used at multiple vendors is as a Credit Card-type account (usually). If all purchases on a credit account are from a single vendor though, Enter Bills/Pay Bills is a better choice because it avoids potential expense reporting problems at year's end (described later).
When the account's monthly statement arrives, you will typically (1) enter charges and credits on the account in QuickBooks, if you haven't entered them already, (2) enter finance charges (if any) at the beginning of the reconciling process, (3) reconcile your QuickBooks entries to the statement, and finally (4) prepare a check or enter a bill to make a payment on the account. Steps 2, 3, and 4 (entering finance charges, reconciling, and making payment) are all part of the same streamlined process centered around using the Reconcile window.
This is another plus for using a Credit Card-type account: you can use QuickBooks' Reconcile window with it. The Reconcile window is not available for Accounts Payable, the account associated with Enter Bills/Pay Bills. (You may never need to reconcile the Accounts Payable account, but if you do, you must use other means which require more effort.)
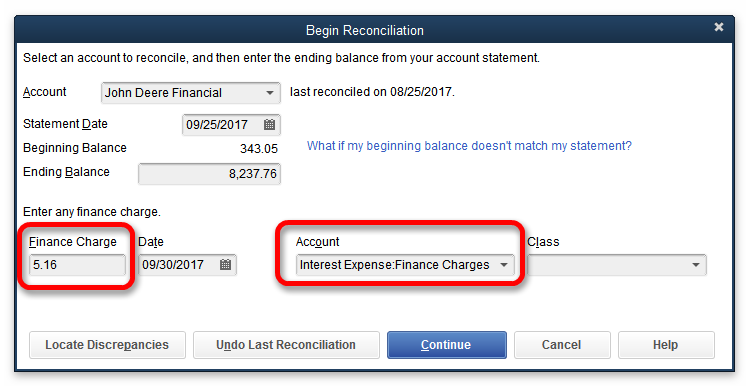
When you choose the menu commands which begin reconciling the account, QuickBooks first presents a form which lets you enter the account balance and any finance charges shown on the statement.
QuickBooks desktop menu commands: Banking > Reconcile
(In QuickBooks Online: [Gear] > Reconcile)
Being able to enter finance charges during reconciling is quicker than when using Enter Bills/Pay Bills, where finance charges must be entered in a separate step, as a Bill.
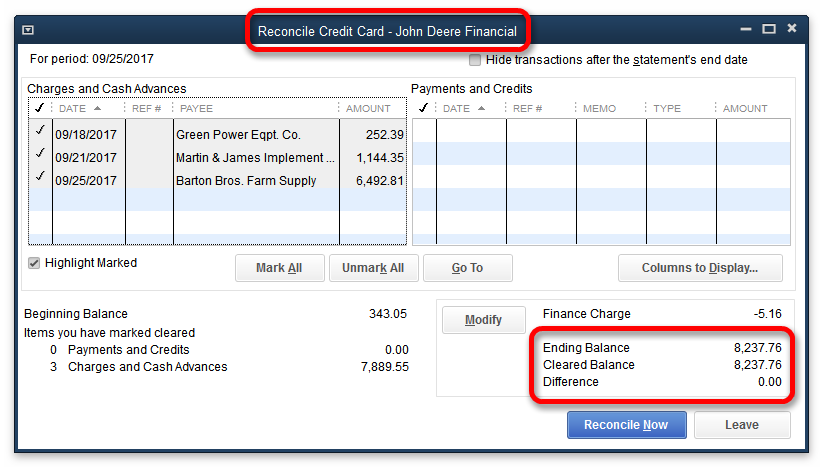
When you continue, the Reconcile window will open. There you can select cleared transactions (charges and payments listed on the statement) by checkmarking them, and add or edit transactions if necessary to correct any errors. Eventually reconciling will be complete, when the total of the transactions you have selected matches the statement balance.
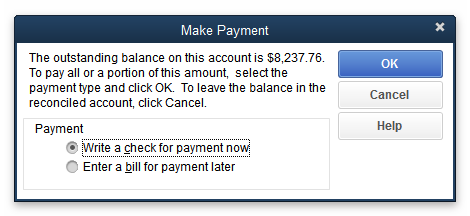
At the end of the reconciling process, QuickBooks offers to create a check or bill as payment on the account, and you can use it to pay all or part of the account balance.
With some credit accounts you may want to be able to selectively pay only certain bills. For instance, some farm suppliers grant a discount for fertilizer invoices paid within a certain number of days. For those accounts you may want to be able to pick out specific bills—just the fertilizer bills—for payment.
If that is something you may want to do, then managing the account as a Credit Card-type account is not the best choice. Using Enter Bills/Pay Bills would be better, because the Pay Bills window lets you select just the bills you want to pay and automatically calculates the correct payment amount for them.
If you want to selectively pay only certain charges use Enter Bills/Pay Bills, not a Credit Card-type account.
This is the only "gotcha" to watch out for when using a Credit Card-type account for managing credit accounts which are not really credit cards...
Part II discussed that farm business purchases made with credit cards (or "payment cards", as defined by the IRS) are immediately deductible as farm expenses, even for cash basis tax filers. However, that is not the case for purchases made with dealer credit, open accounts, or "store cards": those purchase are only deductible after you pay for them—again, assuming you file taxes on a cash basis.
Our example JDF account does not qualify as a credit card account, yet we are handling it using the Credit Card account type in QuickBooks. So QuickBooks assumes that all charges made on the JDF account are immediately deductible, even though they are not.
This is not a problem for purchases made, and paid for, in the same tax year. But what if you enter a purchase dated in December, and don't pay for it until January? If you are a calendar-year tax filer this is a problem, because QuickBooks will automatically include the purchase as a farm expense in "this" tax year, while it should be included in the "next" tax year, since that is when you will pay for it.
Only people over a certain age are likely to immediately know who is "smarter than the average bear"
Beinga shrewd cash basis recordkeeper and smarter than the average bear, you may think "No problem! I'll just date the December purchase as if it had actually happened in January, so the expense and the payment will appear in the same tax year."
That will work in some situations, but not all. What if you charged purchases on the account in October, November, and December, but only paid off part of the account balance by year's end? Deciding which charges you had paid and which you hadn't would be hard to do. And even if you could, the balance you owe on the account would not appear on balance sheet reports as it should (because you haven't entered all of the purchases yet).
How can you avoid this kind of situation? Here are some options:
❖Dating purchase transactions on the account in the same tax year as the payment (mentioned above) is OK to do if you pay off the entire account balance every month. The account won't ever have an outstanding balance for very long, so there's little concern about omitting a large outstanding liability from your balance sheet. And if you want to include outstanding charges on a balance sheet report, simply enter them in QuickBooks before preparing the balance sheet report.
❖Don't use the Credit Card account type for that credit account. use Enter Bills/Pay Bills instead. When you enter a purchase as a Bill, it won't appear in cash basis expense reports until you have paid the Bill. You will be giving up the Credit Card account type's nice features but you won't have to spend extra effort accounting for already-expensed purchases which should not be (because they aren't paid for).
❖"Adjust" expenses for the two tax years involved. You could alert your tax preparer to Credit Card-type accounts with unpaid balances as of year's end, for accounts which are not really credit cards, so that he or she can adjust expenses for the current tax year and the following tax year. Or, either you or your tax preparer could create QuickBooks entries to move the unpaid expenses into the next tax year.
❖Make a Journal Entry dated December 31st to reduce expenses for the current tax year, by crediting the affected expense account(s) and debiting an asset account—one named Unpaid Cash Expenses, for example.
❖Make a second Journal Entry dated January 1st of the next year, for the same dollar amounts. Debit the affected expense account(s) to charge the expenses in that tax year, and credit the asset account (i.e., Unpaid Cash Expenses) to zero out its balance.
LATE UPDATE: I've decided to add a Part IV to this article series, to show another way to deal with some kinds of unpaid expense balances at year's end.
From a technical/accounting standpoint, you should use Enter Bills/Pay Bills to work with accounts which are not credit cards. But the Credit Card account type is handy for working with accounts which operate like credit cards. The main thing you must watch out for, if a credit account is used for farm business purchases, it carrying an account balance into the next tax year. When that occurs, you may need to move expenses between the two years in order to have correct reports for income tax preparation.
Articles and discussions on this site are representations of the author(s)' personal opinions only and are provided "as is" without any guarantee that the information they contain is accurate or that it applies to your particular situation. You assume all risk in interpreting and using the information provided. When in doubt, seek the advice of a competent professional in matters such as accounting, law, and taxes.
Mark Wilsdorf was raised in agriculture, has been deeply involved in it all of his life, and has worked with QuickBooks and accounting software for much of that time as well. He was editor of AgriComp, the first national magazine for agricultural computing, has authored several books about using QuickBooks in agriculture (The QuickBooks Farm Accounting Cookbook™ series), has done consulting work for Fortune-500 businesses serving agriculture, and has been the lead developer on QuickBooks-related software projects, including several QuickBooks add-ons.
If you wanted proof that Mark always has at least one foot in agriculture you might look around his office at home....where you would find things like a folder of soil test reports, calf obstetrical supplies, a seed sample waiting on a germination test, a stack of machinery parts catalogs, and a lariat he will never really learn to use well.
Free articles at QBAgCenter.com (articles provided without charge or fee), hereinafter referred to as ARTICLES, may be copied and distributed for both educational or commercial purposes so long as all of the following requirements are met:
1.ARTICLES may be copied and distributed in whole or in part but each copyMUST include clear attribution of the source including both the author's name and the full address (URL) of the article's source Web page.
2.ARTICLE copies may be distributed in print form ONLY, and MAY NOT be distributed in machine-readable form such as in a computer file, email, or as part of a Web site. The ONLY permitted machine-readable copies of the ARTICLES reside on QBAgCenter.com, so the ONLY permitted way to distribute machine-readable ARTICLE content is by providing a link (URL) to an ARTICLE's Web page.
3.The copyright notice displayed above must be printed on every distributed copy of the ARTICLE and must be displayed in a type size and style which is clearly readable. Copies printed directly from QBAgCenter.com will be deemed compliant with this provision, so long as they do not omit the copyright notice.
4.No fee of any kind may ever be charged for an ARTICLE or for any larger volume in which a copy of an ARTICLE(s) is include, whether the ARTICLE is provided whole or in part. However, ARTICLES may be distributed as handout material at a meeting, conference, class, etc., for which attendees have paid a fee, so long as no separate fee is charged for any ARTICLE copy or for any larger volume of which an ARTICLE copy is a part.
5.All other uses of ARTICLES require express written permission from Flagship Technologies, Inc.
Essentially, these provisions mean you may distribute printedcopies of free (not purchased) articles from the QB Ag Center so long as each copy clearly bears our copyright notice and no fee is charged for such copies.
The above-described permitted uses apply only to free articles. They DO NOT apply to purchased articles (those provided for a fee paid to Flagship Technologies, Inc.). Copying and distribution of purchased articles is prohibited, unless granted by express written permission from Flagship Technologies, Inc.